Sunday, October 23, 2011

Alternate Power Featherweight

I got several comments on my last posting saying how bad I was to sell my wife's Featherweight.  It wasn't really all THAT bad because we still had another one. Unfortunately, my daughter needed a science fair project and decided on Alternate Energy.


She took the other Featherweight and converted it to water power.


My wife tried using this one at a couple of sew-ins but other women complained about all the water on the floor around their electric machines so she had to switch to a 301.

Saturday, October 22, 2011

Cleaning plastic Machines

This post isn’t about a vintage sewing machine, but rather about a technique I discovered that can be used on vintage sewing machines.  I picked up a New Home NH 609 this week.  As far as I can tell, it’s the New Home version of the Janome Jem.  It looked like it had been transported in a truck full of old tires because it had black marks all over it. 


I tried vinyl and rubber cleaner to remove the marks but that had little or no effect.  I remembered the graphing calculator I got at a thrift shop that the extremely intelligent manager had written the price in permanent marker on the display lens.  I tried baby oil, kerosene, and several other non-abrasive methods to remove that marker but nothing worked.  Last resort was some Headlight Lens Restorer I had used on our old Dodge Intrepid headlights.


 I figured if it could clean up plastic headlight lenses, it might also clean up a calculator lens.  Sure enough, that mark disappeared like something David Copperfield would have envied. Out to the garage to get the Headlight Lens Restorer to try on the black marks on this plastic sewing machine.  


Shazam! Those black marks just melted away and the Headlight Lens Restorer polished the plastic so it looks like new.  


All I need now is a spool pin and maybe my wife will get off my back about my selling her Featherweight while she was out shopping.

Sunday, October 02, 2011

Viking 64 40


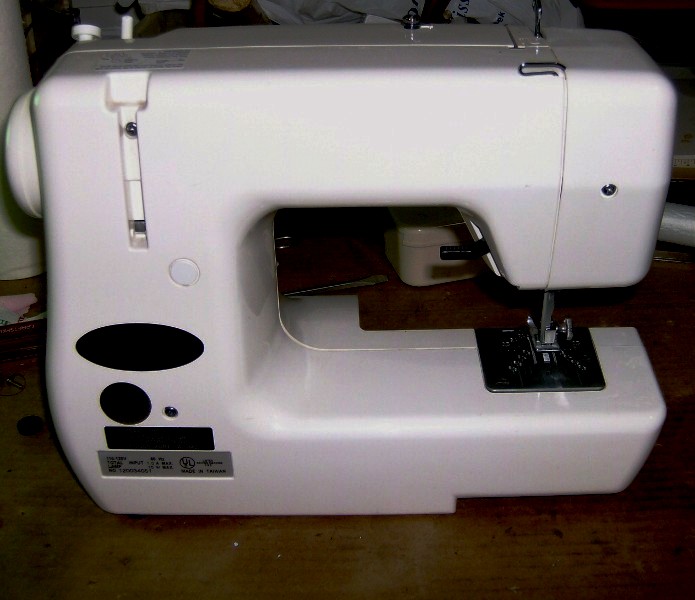
In Fredericksburg, Virginia for a business meeting a few weeks ago, I noticed a Goodwill Store across the street from the hotel where the meeting was being held. Never one to pass up a chance to paw through junk, I headed across the street at the first opportunity. There was only one sewing machine, from a distance, I thought it was a modern plastic Singer and nothing I would be interested in. On closer inspection, it turned out to be a Husqvarna Viking 6440, manufactured in the '75 - '77 timeframe, in good cosmetic condition but frozen solid. Vikings are not common in my area, this was only the third one I have ever seen but it was complete, in good condition, with foot control and some extras and the price was right so it came home with me.

A few years back, I owned a 5000 series and a 6000 series ex-school Vikings and they were pure junk. I couldn’t see why anyone would ever buy a Viking, much less rave about it.  


What I did like, however, was their foot controls. 


Instead of a wiper arm sliding across a rheostat, the Vikings of that era use a wheel rolling across a rheostat.  This makes for much smoother operation and less chance of the foot control sticking. 


They also have a safety feature that completely disconnects power when there is no pressure on the pedal. I still have one of my original foot controls but have been hoarding it until I could find a machine worthy of it. 

When I saw that this Viking had the foot control, I figured that alone was worth the $12.95 sticker price, so I picked it up.

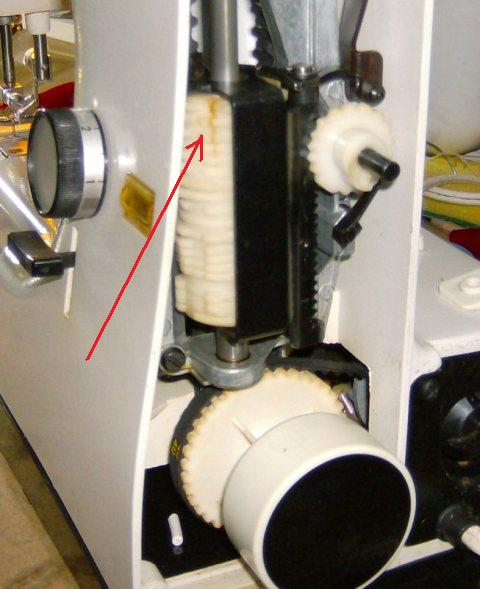
When I got this one home and opened up, I found that even though the exterior was spic & span, the spider webs inside indicated it hadn't been used in some time and had been stored in less than ideal conditions. It took lots of exercising to free up the mechanisms but in about an hour, it started sewing and gets continually better.


It has the slide-on accessory tray that probably wasn’t meant to sew on, but I do anyway, since the table extension was not included. In the tray were some bobbins and a couple of accessories, but by no means a full bag.

I wasn’t expecting much, considering my history with Vikings, but when I started sewing a small project, I was in for a shock! The machine is smooth, quiet, and produces an excellent stitch. Now, I can see why Viking owners are proud of their machines, they probably bought them new and performed all the required maintenance, unlike the school system that produced my first two Vikings.


It only has the “A” cam, so I only have four stitches in addition to straight stitch and zig zag but 99% of my sewing is straight stitch, 0.9% zig zag, and only 0.1% decorative stitch, so I can live without all the fancy stitches. Guess I’ll keep it until it needs some kind of repair, and then I’ll put the foot control on a Necchi Supernova and sell the Viking for parts.

Sunday, September 25, 2011

Pfaff 330

I haven’t done much playing with sewing machines lately because I was involved in a larger project, recovering a chaise lounge we purchased at a thrift shop.  I did get to use my Singer 20U that hasn’t been exercised since we moved over a year ago, but that’s another post.


This Pfaff 330 was an ebay purchase from several years ago.  I decided I had to dig it out of the garage and get it running or get rid of it. 


I liked the machine because it is an early example of a zig zag machine and the bed extension is built in. It just swivels up into place when the operator needs a flat bed.


It came to me with a box of accessories, carrying case, instruction book dated September 1952 and a sales receipt dated 4 June 1953. Not many of my machines have such a provenance!

Those who are familiar with the Pfaff 330 will notice that the bed is unusual.  The paint was cracked and falling off.  Assuming I would never find a suitable paint match, I stripped all the paint off the bed and polished the aluminum.  

After cleaning and oiling, I used it on a small project to test it.  The needle thread kept breaking, so I looked for a burr on the hook that might be the culprit and found the two screws on the outside of the hook burred.  This is not a good photo, I took it with my cell phone but you can get an idea what area I am talking about.


 I smoothed them down somewhat and reduced the amount of thread breakage, but still need to do more work in that area.

I had to stop working on the thread breakage issue because on my second project, the motor became intermittent.  I would step on the foot control and nothing would happen – no hum, no smoke, no rotation – just nothing.  If I turned the balance wheel by hand, the motor would then drive the machine for a while, then nothing again. I popped the motor out of the machine and found the surface of the motor covered with corrosion.  Another poor cell phone photo, but you can see the corrosion all over the surface of the motor.


Apparently, the machine has either been in a flood or subjected to very high humidity for a long time.  The motor commutator was quite dirty and the motor brushes are quite short. I cleaned off all the corrosion I could get to, cleaned the commutator oiled the bushings and cleaned out the brush tubes so the brushes can slide easily.  Reassembled, it appears to be working; I’ll have to use it for a while to determine whether I have made a permanent fix.  In the meantime, I’ll be looking for a new pair of brushes.

Saturday, September 03, 2011

Auction Finds


Went to a local auction this morning and there were more sewing machines there than I have ever seen at an auction.  I counted eleven and might have missed a few.  There was one modern machine, a Kenmore 17000 series that appeared to be well cared-for.


An electric Brother in a well-worn carrying case was tempting because the machine inside was pristine. That case had done its job protecting the cargo inside.


Many of the rest of the machines were Singers, mostly 66s in average used condition but there were New Homes, Domestics, a Paveway, and some other badges I don’t remember.


How many did I end up with?  None!  This Singer 15 was the only one I thought twice about because the cosmetic condition was nearly perfect – all the paint and decals were just like they should be with minimal wear.


But I just don’t want to sacrifice any more space to another treadle machine, so I left it for one of the many Amish who were at the auction.

Thursday, August 11, 2011

Not ANOTHER Necchi!


On vacation last week, I was crawling through thrift stores in Fredericksburg, Virginia looking for treasures.  On the back wall of a Goodwill store, I spotted a plain gray sewing machine carrying case with no name on it.  The metal on the clasps and carrying handle was rusty, an indication that the machine was stored in an area of high humidity. Thinking it was probably a rusty Japanese clone, I reluctantly lifted the lid and found a Necchi Lydia 3 – one of the last of the Italian-made Necchis.


It was dirty and missing the foot control but there was no rust on the inside, it had the extension table (not shown in the above photo), a full complement of accessories, the paint was in good condition and the balance wheel turned smoothly so I gave the cashier the $9.95 on the price tag and tossed it in the back of the van.  I had to go all week knowing that machine was in there and I couldn’t play with it because we were staying in hotels and I had no tools or foot control with me.  Today, I pulled it out and cleaned it up and oiled it.  I had a spare Necchi foot control that could easily be modified to work on the Lydia and didn’t need to replace any other parts.
  I did have a few problems, when I took off the pieces covering the needlebar and presser bar, a plastic piece fell out and it took a while to figure out that it controlled the presser foot pressure and how to get that piece reinstalled properly. After I finally got the machine all back together, I couldn’t figure out how to thread it and had to get on the internet and look up a threading diagram; then there were tension issues.  Cleaning the tension disks seems to have solved that one.
  The reason I have no Lydias in my Necchi collection is because that model has a fatal flaw – a plastic camshaft.  The camshaft controls all the decorative and utility stitches and the camshafts made of plastic crack after a period of years and have to be replaced for a King’s ransom.  In the store, I set the stitch selector on a decorative stitch and carefully felt for bumps as I slowly turned the balance wheel.  If the camshaft is severely cracked, you can feel the imperfection as the cam follower rides over the crack.  The decorative stitches will all have a visible flaw because the crack acts as a low spot on the cam and allows the needle to move in a direction that was not intended.


  Opening the end cover, my fears were realized when I saw several small cracks in both ends of the camshaft.  The good news is that none of the cracks run the full length of the camshaft, this is the worst one. Also, none of the cracks are wide enough to visibly affect the decorative stitches.  It sews well on a test, patch, now to find a small project to more fully check it out.

Sunday, July 24, 2011

Who Let the Feed Dogs Out?


Singer 645

Back in the middle of the 600 Series Touch & Sews, Singer decided that rubber-coated feed dogs would be a good idea.  They would feed even the finest of fabrics without snagging or leaving marks on the fabric. 


  Unfortunately, Singer forgot that rubber and sewing machine oil don’t play well together and the rubber coating on the feed dogs softens and crumbles off.  When that happens, fabric will not feed and the machine will not sew.
A couple of weeks ago, a friend asked me to look at a 645 that she picked up at a thrift shop.  The first thing I saw was that the rubber had melted and was all out of shape. 


  Before investing $20 in a new feed dog, I looked at the internal gears.  This series not only has a rubber feed dog, but plastic internal gears, also.  All the plastic gears appeared to have been replaced because they were all black.  The original gears were white and turn yellow/brown with age just before they crumble and break.  Someone had spent a good deal of money having those gears replaced and I have not yet seen a black replacement gear crack or break.   The machine ran quiet and smooth, so I decided it was worth the money to replace the feed dog.

  Rubber-coated feed dogs are available but there is another option.  After a few years, Singer realized that rubber-coated feed dogs were a mistake and went back to metal feed dogs with teeth.  Those feed dogs from later model 600 series Touch & Sews fit perfectly where the rubber feed dogs were.


 Just pop off the throat plate, remove the two screws holding the feed dog and lift off the feed dog.  Set the new piece in place, replace the two screws and reinstall the throat plate.  Takes less than 15 minutes.  The metal feed dogs are about $2 cheaper but I happened to have one in the parts bin from a machine with cracked gears that I had parted out. 

After seeing this machine, I am re-thinking the plastic gear issue and might try replacing a full set myself next time I run into a 600 series Touch & Sew that needs re-gearing.


Sunday, July 17, 2011

Sad Necchi BU


I have a soft spot in my heart for the Necchi BU because a $10 one from a thrift shop was my first exposure to the quality and sturdiness of Italian-built Necchis and Necchis have been my favorite machines ever since.  A few of the post WWII Japanese machines come close, but I have found none yet that can match the smooth, quiet sewing of a well-oiled Necchi BU or Supernova.  Anyway, this BU had been relegated to my storage shed for several years at the old house and sitting in the garage at the new house since we moved in a year ago.  It has been so long since I used it, I don’t even remember why I initially put it in storage.  It isn’t pretty by any means, paint on the bed is cracking, paint on the head is dull and the chrome is beginning to rust.  I vaguely remember tension issues, but can’t be sure after all this time.  I decided it either had to be rehabilitated or stripped for parts.  Either way, it was not going to take up precious garage space any longer.

On the workbench, I found that the balance wheel would only make about half a rotation so I lubricated every friction point with Tri-Flow Lubricant and worked the balance wheel back and forth for about half an hour.  Things weren’t getting any freer, so I got out a spray can of Permatex Ultra Slick Synthetic All-Purpose Lubricant and sprayed that all over the underside and inside the machine.  In short time, the mechanism freed up and the motor spun the machine so fast I thought it was going to take off!  That lasted for about a minute, and then it froze up again.  This has been my experience with the modern wonder lubricants - they don’t do what they advertise and don’t last.  Resorting to the old standby sewing machine oil, I oiled the machine and in just a few minutes had it running like new. At least the modern wonder lubricants broke the mechanism loose so the sewing machine oil could do its job.

The next issue was mounting the head in a cabinet.  Original ads for the Necchi BU stressed the fact that many parts of the machine were common and repairs would not be a problem.  But for some odd reason, the holes for the cabinet-to-machine mounting hinges are smaller than all the rest and standard hinges will not fit in the holes.  It's virtually impossible to find a set of the correct hinge pins.  In the past, I have reamed out the BU holes to accept standard hinges but am afraid that might weaken the bed and the weight of the machine could cause the metal of the bed to crack and the machine fall out of the cabinet.  Now, I take a standard set of hinge pins and grind them down just enough to fit the holes in the BU.

This was not the last of the problems, though, when I attempted to sew a test patch, the material wouldn’t feed and when it did, stitch length was not consistent.  It also felt like the presser foot was not doing a good job of pushing the fabric down against the feed dog.  I lowered the presser foot about a quarter inch and stitch quality improved. I haven't permanently solved this problem, I think the presser foot is not original Necchi but an industrial high shank foot.  Many folks don't realize that high shank feet and industrial feet are the same thing.  If you have high shank machines and need feet, investigate the industrial feet sold on eBay for options.  Anyway, I will try replacing this one with a Necchi foot to see if it makes any difference, if that doesn't fix it, I will lower the presser bar a bit.


One thing I like about this machine is the light.  It has “Necchi” embossed on the shade, so I am fairly sure it is a genuine Necchi light but it is mounted using a swivel with multiple joints so the light can be repositioned an infinite number of ways.  If I ever decide to get rid of this machine, I will definitely keep the light.

Wednesday, July 13, 2011

A Squid in My Jeans?


With all my recent business travel, college visits with my Rising Senior Daughter, and family illnesses, it has been a long time since I last posted.  To get back in the swing, I am going to start off with a simple recycled jean project.

 In Big Lots yesterday, I spotted a cell phone charger on sale for $8.  That’s not a great price, except this model had a charger that would plug into either a wall socket or a car cigarette lighter and six different “heads” to fit many different phones.  I could see carrying only one charger and using it to charge my daughter’s Motorola, my Blackberry, and my wife’s LG either in the minivan or in a hotel room.  I envisioned the cable looking like a squid with a head shaped like a USB plug and six tentacles streaming out behind.  In that configuration, I could conceivably charge all three phones simultaneously.


  Unfortunately, when I got home and opened the package, I found the squid head shaped like a USB plug, but the tentacles were separate adapters that plugged individually into the South end of the squid.  So, I can only charge one phone at a time and I had to come up with some way to keep track of all those loose adapters.


Knowing that I had a pair of discarded jeans on my cutting table, I decided to recycle that fabric, rather than buying new.  As I looked to find the best place to cut, I noticed a rear pocket and decided that if I could incorporate that pocket into my design, half of the cutting and sewing had already been done for me.  I cut out the pocket leaving about one inch of fabric all around.  


Next, I cut a chunk from the bottom of a leg, keeping the hem intact.  I trimmed that piece to the exact shape of the bottom and sides of the pocket, with about 2-3 inches extra at the top to serve as a cover flap.


I rolled over the fabric above the pocket and made a hem.  Then, I measured and sewed six even slots in the pocket to hold the six adapters.  


Next, I sewed the pant leg piece to the back side of the pocket and rolled the extra fabric from around the pocket to the back side and sewed along the pocket seam to hold it.  I could have been neater if I had taken more time, but thinking this would only be a prototype, I was more interested in getting it done quickly.


After coming up with some way to fasten down the flap, the six adapters fit snugly in the pocket and the charger and squid live in the compartment behind the pocket.


To keep this on topic, I was going to discuss the Necchi BU I used for this project, but this post has gotten so long I will save that for another day.

Friday, March 18, 2011

Fair Lady?

Lest you think I don't care about anything but Necchi and Singer, let me show you my latest acquisition - a White Model 764. I have seen it called a "Fairlady" or "Fair Lady"on the internet, but see nothing on the machine itself to substantiate that.


 I have been hoping to run across one of these for many years because I just like the looks with that integrated handle. Until today, every one I had seen was either way too expensive, or in poor condition, or both. I happened across this one in a thrift shop while I was searching for an AC adapter for some wireless headphones. One look at the immaculate paint and the $20 price tag and I didn't even spin the balance wheel, just bought it then and there.

 When I got it home and started playing with it, I found the bobbin case jammed in the shuttle race and the check spring out of adjustment. Oh, and it was missing the presser foot.  It took less than 10 minutes to get it sewing.

 It is in exceptional condition, not a chip or scratch on the paint. Any imperfections you think you see in the photo are either reflections or dust. That's the secret to collecting vintage sewing machines, go for the cosmetic condition because the mechanicals can be replaced, but once the paint is gone, it's gone.

  The engraving on the bobbin cover (it's not a slide plate 'cause it doesn't slide - maybe it's a hinge plate) says "Selected for the House of Good Taste New York World's Fair".  That puts this machine's birthday around 1964.

Saturday, February 12, 2011

One-Block Wonder

I haven't blogged in quite some time - buying a new house and business travel have occupied most of my spare time in the past year. Today, I had time to fit in a small sewing project. A co-worker who has a phobia of sitting in seats previously used by strangers (rental cars, airline seats, etc.) asked me to make a seat cover for her. She gave me a piece of yoga mat cut to the shape she wanted and I was to make a cover for it. She provided very little guidance, when I asked what color she would like, she said, "surprise me" and when I asked if there was some special quilt pattern she would like, she said, "no, anything quilty".

With that to go by, I started rifling through my wife's quilt fabric stash for raw materials and hit the internet looking for a block pattern I could whip up in a hurry that would still look like I worked real hard. Here is the finished product:


Because piecing quilts is boring to me, I only make small quilt items. My wife calls me a One-Block Wonder.

To keep this on topic, for this project I used my latest acquisition, a Singer 201 from a local thrift shop for the piecing.


I was driving by one day and saw it sitting outside with a $30 price tag on it and had to buy it. I consider the 201 one of Singer's best-made machines. With the rotating hook and gear-drive motor, they run smooth and quiet and produce perfect stitches. The AG2XXXXX serial number places this one's manufacture squarely in 1941. It's not in the best condition, but they are getting harder to find in the wild and I try to keep one around at all times.